Polaris STM “MAXXX” TUNER INSTRUCTIONS — Install Guide
Polaris · 2022+ Pro R (RZR)
2022+ Polaris Pro R-Sport/Premium/Ultimate 4 CYL
ITEM# PART # DESCRIPTION QTY 1 2001368 MOVABLE SHEAVE “PRO R” TUNER SECONDARY 4 CYL ENGINE 1 2 2001367 /2001316 FIXED SHEAVE “PRO R” TUNER SECONDARY 4 CYL ENGINE 1 5 1001696 MAXXX TUNER HELIX 1 6 1001692 HD LONG BOSS COMPRESSION SPRING HELIX COVER 1 7 ATVSS KSS STYLE COMPRESSION SPRING 1 8 1001697 MAXXX TUNER SECONDARY ROLLER 3 8B 1001698 MAXXX TUNER SECONDARY BUTTON 3 10 1001060 ADJUSTER NUT THRUST WASHER 3 11 2408 /VH175 COVER BUSHING w/ RETAINING CLIP 2 11B 4020.787/VH181 MOVABLE SHEAVE BUSHING w/RETAINING CLIP 1 12 1001059 ADJUSTER NUT 1 13 1001049 HELIX COVER HD SPRING WASHER 1 16 8-32x.5” SHCS BUTTON / ROLLER PIN RETAINING SCREW 6 17 1001699 MAXXX TUNER THREADED ROLLER / BUTTON PIN (M12x1.75”) (145 in / lbs) 6 18 2001320 TUNER HUB RETAINING INSERT 1 19 1001700 MAXXX TUNER SECONDARY FASTENER KIT -Torque spec on back page 1 40 1001064 TUNER SECONDARY ADJUSTER NUT TOOL 1
* * * Please visit website for item pricing * * * STM Powersports (248) 673-8408
www.stmpowersports.com 4/30/2025
It’s important to completely read the directions before installing the clutch!
Installation
Remove the stock secondary clutch from the shaft. To install the STM Tuner Secondary put the machine in low, high
or reverse, slide the secondary over the shaft until you feel it bottom out. Rotate the secondary to align the splines and slide
it the rest of the way onto the shaft. FAILURE to correctly align the splines will cause damage to the internal splines on the
secondary.
Once you are confident that the splines are aligned and the secondary if fully seated, install the #18 tuner hub
insert with the stock bolt. Use small amount of blue Loctite® on the stock bolt and torque to 55 ft/lbs. Install the belt using
the #40 tool and a ⅜” socket wrench, turn the #12 adjuster nut clockwise to open the sheaves, install the belt around the
primary clutch first, then around the secondary. Turn the adjuster nut counterclockwise until it is at the end of the shaft or
remove it completely, put the machine in neutral, spin the secondary so the belt will come to the top and become tight. Turn
the adjuster nut along with the #12 adjuster nut thrust washer clockwise until it contacts the #6 cover, go an additional ¼ to
½ turn and tighten the ¼-20 SHCS on the adjuster nut.
Start the machine and shift from forward to reverse- if it is hard to shift turn the adjuster nut clockwise another ¼ to
½ turn. Repeat the steps until you achieve proper belt deflection (as tight as the belt can be without the machine being hard
to shift in and out of gear). Double check the torque on the stock bolt and make sure the ¼-20 SHCS bolt is tight.
Periodically check all fasteners and always use blue Loctite®.
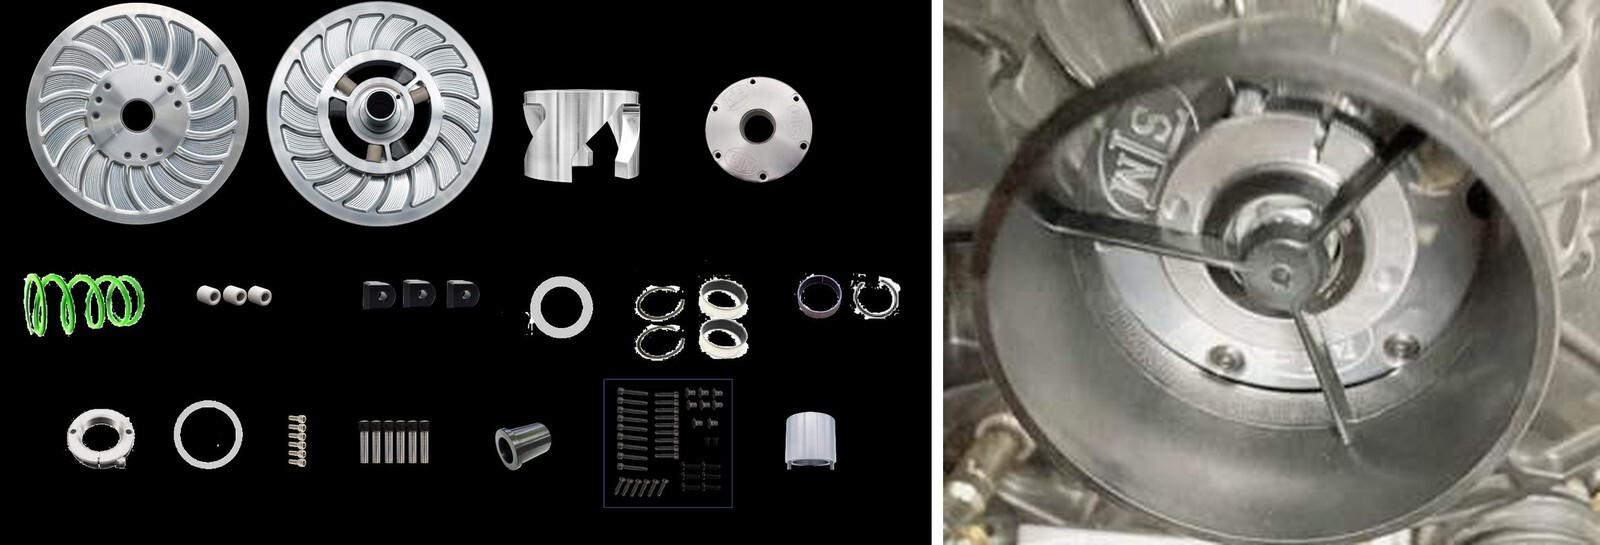
CUT WHERE THE “Y” TOUCHES
BOLT KIT TORQUE SPECS
¼-20 Helix Screw 125 in/lbs
SHCS
10-24 Helix Cover 45 in/lbs
Screw
8-32 Bushing, 17.8 in/lbs
Roller & Button
Retaining Screw
THE OUTER RING AND REMOVE!
***Running the clutches without installing the clutch housing cover can cause premature wear and may lead to potential damage or failure. ***
For more tuning/set-up help please visit our website
WWW.STMPOWERSPORTS.COM and click on “Tech Info.”
DISCLAIMER
This is an aftermarket performance product. It is the consumer’s responsibility to read and follow the appropriate procedures listed for using this product. Consumer accepts all consequences by not following the above procedures. STM is not liable for any personal or property damage caused by this product.
IMPORTANT READ BEFORE INSTALLING WARNING
The high-performance products you purchased are not for installation or operation by “Consumers”, as defined by Magnuson-Moss Warranty Act. Do not install any performance parts or services unless you have the technical ability to properly set up the entire machine to compensate for the installation of those parts. References in most of our literature to “bolt-on-parts” only indicate the parts are removable from the engine (as opposed to porting or machining type modifications). It is not meant to imply that the parts can be installed without additional modifications. The necessary work and expertise needed to install different products vary. Instructions, where provided, are given to assist in installation only; they are NOT a substitute for mechanical experience in setting up racing snowmobiles, watercraft or land-based vehicles. References to performance gains, reliability, ease of installation, etc. are based on our, and outside customer’s experiences. This is NOT a guarantee of similar performance in every installation. While we sell proven hardware, in the end it is up to the individual racer to make the most of that hardware in his/her application.
STM Powersports (248) 673-8408
www.stmpowersports.com 4/30/2025