Hardware Setup Instructions Stages 1 Stock Injector 1. Verify your wastegate crack pressure is set to 7 lbs. (This should be the factory setting on the 2018s. 2017 Upgrades will need to raise the crack pressure to 7 lbs) (see wastegate adjustment procedure) 2. Use only GOOD 91 Octane or better fuel 3. Recommended: Re-gap OEM Spark Plugs to .016-018”
Stages 2R & 3R Stock Injector 1. OEM Wastegate crack pressure must be raised to 8 lbs. (see wastegate adjustment procedure) 2. Use only GOOD 91 Octane or better fuel 3. Recommended: Re-gap OEM Spark Plugs to .016-018”
3R-93 Stock Injector 4. OEM Wastegate crack pressure must be raised to 8 lbs. (see wastegate adjustment procedure) 5. Use only GOOD 93 Octane or better fuel 6. Recommended: Re-gap OEM Spark Plugs to .016-018”
Stages 3RWi BIG INJECTOR 1. Install new EVP supplied wastegate actuator – reuse the OEM rod end - refer to picture on page 3. Set new wastegate actuator crack pressure to 8 lbs. (see wastegate adjustment procedure) 2. Install injectors (see injector instructions) 3. 3RWi = 93 octane fuel
- Or mix 1 gallon of 110 octane race fuel to 4 gallons of 91 Octane
- Or mix 1.5 gallons of 100LL or 100 octane race fuel to 3.5 gallons of 91 Octane 4. Recommended: Re-gap OEM Spark Plugs to.016-018”
Stage 4RWi BIG INJECTOR 1. Install new EVP supplied wastegate actuator – reuse the OEM rod end - refer to picture on page 3. Set new wastegate actuator crack pressure to 9 lbs. (see wastegate adjustment procedure) 2. Install injectors (see injector instructions) 3. 4RWi = 95+ octane fuel
- Or mix 1.5 gallon of 110 octane race fuel to 3.5 gallons of 91 Octane
- Or mix 2.5 gallons of 100LL or 100 octane race fuel to 2.5 gallons of 91 Octane 4. Required: Re-gap OEM Spark Plugs to.016-018”
Stage 4RWi-MM 95/91 BIG INJECTOR 1. Install new EVP supplied wastegate actuator – reuse the OEM rod end - refer to picture on page 3. Set new wastegate actuator crack pressure to 9 lbs. (see wastegate adjustment procedure) 2. Install injectors (see injector instructions) 3. 4RWi = 95+ octane fuel
- Or mix 1.5 gallon of 110 octane race fuel to 3.5 gallons of 91 Octane
- Or mix 2.5 gallons of 100LL or 100 octane race fuel to 2.5 gallons of 91 Octane 4. Required: Re-gap OEM Spark Plugs to.016-018”
Stage 4RWi X100 BIG INJECTOR
Stage 5RWi X85 BIG INJECTOR
Injector Removal and Installation Instructions for 3Ri-5RWi Tools needed: T30 Socket, compressed air, dielectric grease, small flat blade screwdriver - NOTE: ENGINE MUST BE COLD TO DO THIS INSTALL!!!!
- Use compressed air to blow out dirt and dust around the fuel rail and injector seats
- Using a T30 socket, remove the two torx screws securing the fuel rail to the plenum
- Lift the fuel rail upward and back (without removing the injectors) – this will make it easier to disconnect injector plugs. Squeeze the retainer clips to release plugs from injectors and remove.
- Move fuel rail to the passenger side of the engine so it is easier to work on. Use a small flat blade screwdriver to remove the injector clips securing the injectors to the fuel rail – make note of their orientation as they will be installed the same on the new injectors.
- Apply dielectric (silicone) grease on the top and bottom o-rings of the new injectors
- Install the injectors into the fuel rail in the same orientation as they were removed.
- Reinstall clips making sure they are installed onto the injectors in the groove the same as they were on the OEM injectors
- Reconnect injector plugs
- Reinstall fuel rail hold down bolts – DO NOT OVERTIGHTEN!
- Push start button, but do not start the engine – check for fuel leaks – if there is any leaking of fuel from the injectors or fuel rail, this must be addressed prior to running the engine!!
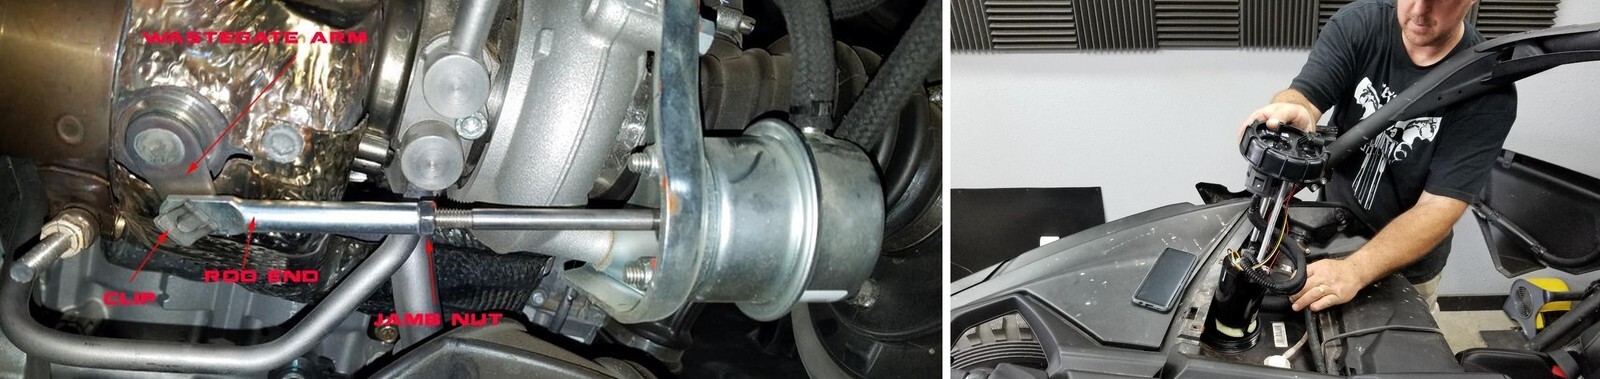
WASTEGATE ADJUSTMENT PROCEDURE
(only for tunes that require it) Tools needed: Small flat blade screwdriver, Mityvac MV8255 (can be purchased on Amazon.com) or similar pressure gauge, 10mm wrench
- Remove panel between the seats that allows access to the turbocharger
- Using a small flat blade screwdriver, remove the clip that holds the wastegate actuator rod onto the wastegate arm
- Using a 10mm wrench, loosen the jamb nut on the wastegate rod
- Remove the wastegate rod end from the wastegate arm. Screw the rod end clockwise to shorten the arm to raise the crack pressure. Conversely, lengthen the rod to lower the crack pressure. Check crack pressure with Mityvac. Please see our Youtube video for the correct way to do this https://youtu.be/qOg2MnBfl08
- Check pressure 3 times to make sure it is correct!
- Put the wastegate rod end back onto the wastegate arm.
- Reinstall the clip and tighten the jamb nut.
MULTI MAP
(For customers that have purchased the Vmap Multi Map Option)
Multi Map enables customers to use the “Sport Mode” and “ECO Mode” switch to select different tunes. Included is a new switch cover labeled “Race Gas” and “Pump Gas”. Customers can switch between tunes using this feature.
- Remove the factory sport/eco mode switch
- Install the Supplied EVP 95 Oct/91 Oct switch
- For a Stage 4RWI Tune with the Multi Map Option – 95 Octane Fuel is required
- How to make 95 Octane:
- Or mix 1.5 gallons of 110 octane race fuel to 3.5 gallons of 91 Octane
- Or mix 2.5 gallons of 100LL or 100 octane race fuel to 2.5 gallons of 91 Octane
- YOU MUST BE CAREFUL USING THIS FUNCTION – ACCIDENTALLY RUNNING IN “RACE GAS MODE” WHEN PUMP GAS IS IN THE TANK CAN DAMAGE YOUR ENGINE
CLUTCHING
The X3 engine tuned makes best power around 7900-8100 RPMS. Strongly consider a clutch kit from us or another reputable company to get the best performance and belt life out of your vehicle.
18 FUEL PUMP INSTALLATION
6. Install the 2018 fuel pump assembly in the reverse order. Make sure to reinstall the rubber gasket at the top of the fuel tank or the tank will leak!!!
Note: This product is exempt from the emission standards and related requirements of 40 C.F.R. § 1051 as provided by 40 C.F.R. § 1051.620, and California law [e.g., vehicle code§§ 27156 and 38391]. This product is sold only for use in connection with EPA certified, purpose-built, nonroad vehicles used solely for closed course, nonroad competition/racing and not used for any recreational purpose or on public highways or right of ways maintained by and open to the public. This product is sold only in connection with machines that do not fall under state and/or federal noise or emission standards/regulations. Purchasers who/that purchase this product represent and warrant that the product is purchased only in connection with EPA -certified, emission-regulations-exempt and noise-regulations- exempt competition/racing vehicles as interpreted under applicable state and/or federal law. Questions: Call Evolution Powersports at (715) 247-3862.