Installation instructions for the EVP Head Stud Kit on the Arctic Cat 9000/1100T engine, covering camshaft removal, head stud replacement with the proper torque sequence, and cam timing reassembly.
9000/1100T Head Stud Kit
- Disassemble the chassis to facilitate clear access to the top of the engine
- Remove the four cap screws securing the cylinder head cover to the cylinder head; then remove the cover.
- Remove Spark Plugs (BE VERY CAREFUL NOT TO LET ANYTHING FALL INTO THE SPARK PLUG HOLES – USE A PAPER TOWEL TO BLOCK THE OPENINGS
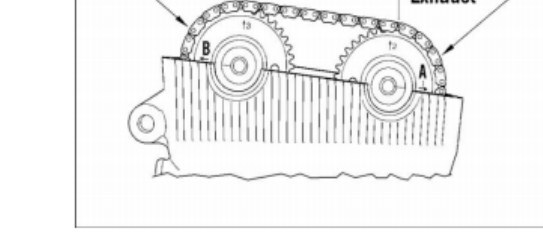
- Obtain top-dead-center by rotating the crankshaft in the normal engine running direction (DO NOT rotate crankshaft in reverse or you will mess up the cam timing!) until the arrows on the exhaust camshaft face (A) are in the 12 o'clock and 9 o'clock positions and the arrows on the intake camshaft face (B) are in the 12 o'clock and 3 o'clock positions. See diagram below.
- Mark a link and tooth on each gear with white out for indexing purposes

- Loosen but do not remove the tension adjuster bolt and washer (A) from the chain tensioner assembly. Remove the two cap screws (B) securing the assembly to the engine. Remove the assembly.
- Remove the cap screws securing the camshaft covers to the cylinder head; then remove the covers. Remove both camshafts. Account for the dowel pins. Secure the timing chain with a zip tie so that it does not drop down into the case.
- Clean the lubricant off of the new head studs with brake or electrical cleaner. Make sure there is no lubricant on the threads as you will be using LOCKTITE in the next step.
- ACCORDING TO THE BELOW TORQUE PATTERN, REMOVE 1 BOLT & REPLACE WITH A STUD AT A TIME SO THAT THE CYLINDER HEAD NEVER HAS MORE THAN ONE BOLT/STUD LOOSE AT A TIME. EACH HEAD STUD REQUIRES RED LOCTITE ON THE THREADS THAT GO INTO THE CYLINDER HEAD/BLOCK . SCREW EACH STUD INTO THE BLOCK SO THERE IS 5/8" OF AN INCH OF STUD EXPOSED ABOVE THE HEAD - THIS MAY NOT BOTTOM OUT THE STUD. USE THE ENCLOSED LUBRICATION FOR THE THREADS ON THE TOP OF THE HEAD STUD EXPOSED. APPLY SUPPLIED LUBE TO BOTH SIDES OF A WASHER – SLIDE A WASHER AND NUT ONTO THE STUD. FINGER TIGHTEN THE NUT – WHEN THE NUT IS FINGER TIGHT, THE STUD SHOULD STICK UP OUT OF THE TOP OF THE NUT ABOUT 1MM. IF THE STUD THREADS ARE STICKING UP OUT OF THE NUT BEYOND THIS, SCREW THE STUD IN FURTHER. IF THE TOP OF THE STUD IS BELOW THE TOP OF THE NUT, BACK THE STUD OUT UNTIL 1 THREAD IS EXPOSED ABOVE THE NUT. TIGHTEN TO 40 FT LBS FOR NOW. Repeat according to the pattern below.
- Once all head bolts have been replaced with studs, nuts and washers, tighten all nuts to 55 lbs according to the pattern above, then repeat to a final torque of 70 lbs according to the pattern above
- With the timing marks (A) on the face of the camshaft gear properly aligned, place the camshaft into position on the cylinder head.
- With the cam chain properly seated to the gears of the crankshaft and exhaust camshaft, install the intake camshaft noting the timing marks (B) and index marks are properly aligned.
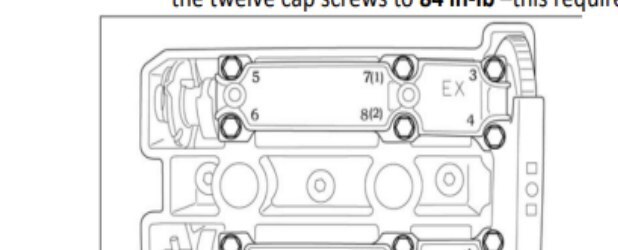
- With the camshafts in position and properly timed and the dowel pins in place, install the camshaft covers along with cam chain tensioner guide number two; then using the pattern shown below, tighten the twelve cap screws to 84 in-lb –this requires a very fine torque wrench.
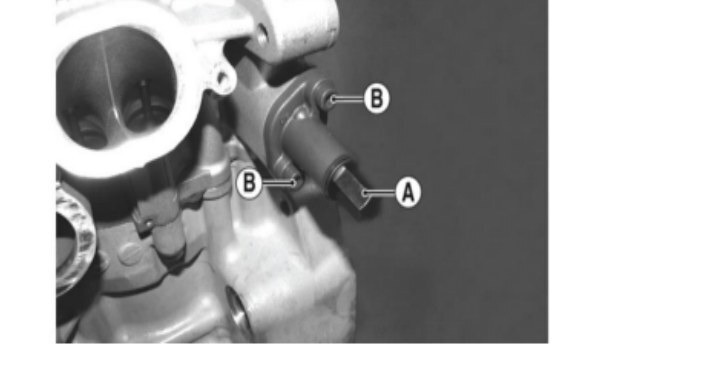
- Remove the tensioner ball, spring, and bolt. Be careful not to lose the ball!
- Install the cam chain tensioner adjuster by first compressing the locking clip; then by pushing in the tensioner shaft until completely compressed. See Picture
- Install the tensioner and secure with two Allen-head cap screws; then tighten to 84 in.-lb. Install the ball, spring, and tensioner bolt and tighten to 18 ft-lb.
- Install the engine cover alignment pins; then install the engine cover and secure with four cap screws and plastic washers. Tighten the cap screws to 120 in-lb.
- Reinstall spark plugs and caps
- Reassemble chassis

Note: This product is exempt from the emission standards and related requirements of 40 C.F.R. § 1051 as provided by 40 C.F.R. § 1051.620, and California law [e.g., vehicle code§§ 27156 and 38391]. This product is sold only for use in connection with EPA certified, purpose-built, nonroad vehicles used solely for closed course, nonroad competition/racing and not used for any recreational purpose or on public highways or right of ways maintained by and open to the public. This product is sold only in connection with machines that do not fall under state and/or federal noise or emission standards/regulations. Purchasers who/that purchase this product represent and warrant that the product is purchased only in connection with EPA -certified, emission-regulations-exempt and noise-regulations-exempt competition/racing vehicles as interpreted under applicable state and/or federal law. Questions: Call Evolution Powersports at (715) 247-3862.